Working IO-117 / Greencube with an FT-847
The recent launch of Greencube, recently designated IO-117, is the highest-orbit workable amateur radio satellite I have been able to work since starting amateur radio satellites in early 2020. Until now, the satellite with the largest footprint has been RS-44, which I have made many contacts on, but the MEO orbit of Greencube allows for much longer distance contacts, including Asian and European countries from my QTH in Arizona that were not previously possible.
Most operators using Greencube/IO-117 seem to be using the Icom IC-9700, which has a built in sound card and can be fairly easily configured to work the satellite with PstRotator with a single USB cable, with a detailed writeup by FG8OJ over here.
The FT-847 has some unique quirks that make setup not as straightforward. First, it has no sound card so some additional hardware is needed to route transmit and receive audio to a computer for processing. It also has a satellite mode that does not permit configuration or Doppler control of a satellite with both uplink and downlink in the same band. I believe SatPC32 has a separate component called SatPC32ISS that is specifically designed for CAT control with uplink/downlink on the same band, but I prefer PstRotator since I have no home station and all of my operation is portable. SatPC32 does not handle frequent CAT control connections/disconnections nearly as well as PstRotator. Another issue with the FT-847 is that it does not support VOX to automatically trigger transmission on audio input. That means triggering some form of PTT.
NOTE: In no way am I saying this is the best way to work Greencube with an FT-847. I’ll be working to improve this and if you find improvements from your own FT-847 please contact me.
Components needed
Hardware
- Yaesu FT-847
- High gain 70cm antenna (I am using the 70cm elements of an Alaskan Arrow II)
- CAT cable (null-modem USB to RS232)
- External sound card (I am using the MiniProSC but any card will do)
- It’s also possible to just use line in and out audio cables if you don’t have a sound card
- Heil AD-1-Y mic adapter
- Only needed if you are planning to use the mic input to transmit audio rather than the PKT data in port with your sound card
- 3.5mm TRS audio cables
- Only needed if you are planning to use the mic input to transmit audio rather than the PKT data in port with your sound card, or if you are planning to use only analog audio cables for both uplink and downlink
Software
CAT control for downlink Doppler correction
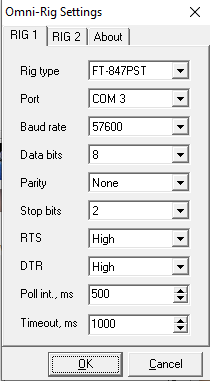
The basics of CAT control with PstRotator are covered well in its user manual. You will need to install both PstRotator and OmniRig, and configure the FT-847PST.ini rig type within OmniRig to get the connection working. You’ll also need to match the baud rate in OmniRig to the baud rate configured on the radio under menu item 37. Here are my OmniRig settings for reference:

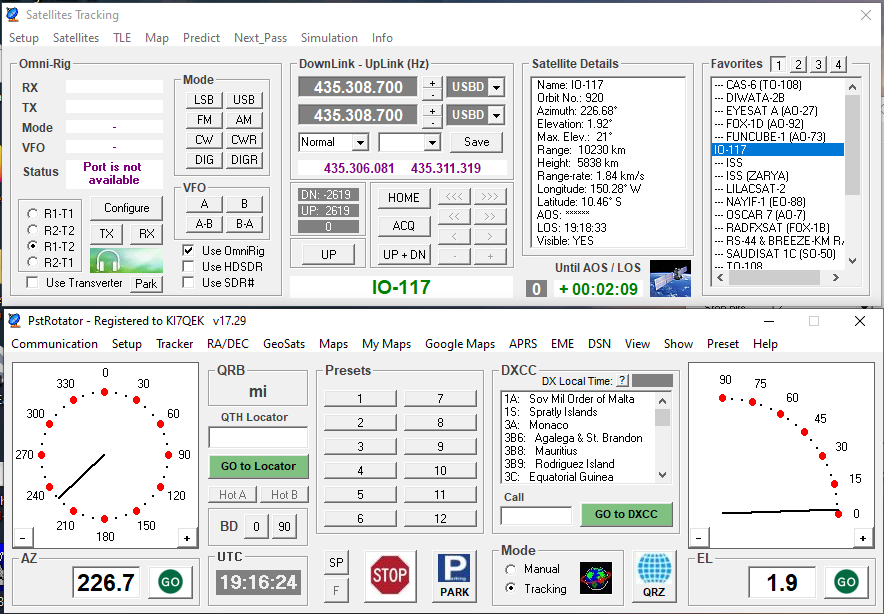
You will want PstRotator to control the downlink only, and adjust the uplink frequency manually via the sub-tune knob on the front of the radio. To get PstRotator to control the downlink only, configure the setting on the satellite menu for R1-T2 (assuming you configured the FT-847 in the Rig 1 settings of OmniRig). That means PstRotator will only attempt to do CAT control of the downlink and try (and fail quietly) to update uplink frequency on a second radio that doesn’t exist.
Although the frequency for the satellite is theoretically 435.810 MHz, it seems to actually be closer to 435.3087, so update your IO-117 starting frequencies in PstRotator to that and save the configuration. Now, when you have the Use OmniRig configuration ticked and IO-117 selected in the satellite list to the right, you should see the downlink adjusting on your radio. PstRotator may put your FT-847 into satellite mode, but it cannot operate Greencube in satellite mode — if you attempt to transmit with both VFOs on the same badn the radio will display an error. To correct for this, untick Use OmniRig and exit satellite mode and ensure split mode is enabled. You will then need to manually enter into the sub VFO on the radio the starting frequency of 435.8087 MHz USB using its keypad. Because you will be adjusting the sub tune frequency quite a bit using that knob, it’s probably a good idea to enable FAST mode on the radio to speed up that tuning. Finally, re-check Use OmniRig in PstRotator to re-initialize the CAT control. Now, when you hit the UP + DN button in PstRotator, you should be able to track the downlink accurately and manually adjust the uplink needed for the radio to work the satellite.

Decoding/Encoding messages the Greencube digipeater
I am currently using the MiniProSC as an audio card connected to the PKT port on the back of the radio, and connected to one of the USB ports on my laptop. This sound card can handle both input and output audio correctly. However, you could also use the Heil adapter to route your audio out from your sound card/headphone jack into the radio and use the audio out from the radio to the line in on your sound card.
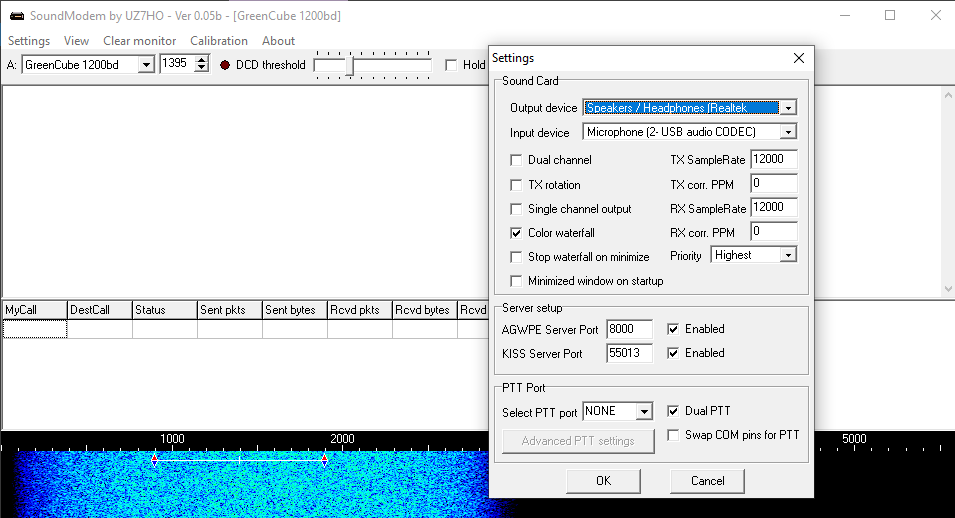
Depending on which audio configuration you are using, you will need to open the UZ7HO Soundmodem software (the ssb version in the zip file above) and configure it to use the correct audio devices. In my case, since I am currently using a USB sound card for downlink audio as an input and my laptop’s headphone jack for uplink audio as an output, my settings in Soundmodem look like this:

I will likely switch to either a smaller USB sound card like this Sabrent $10 sound card or entirely to using the MiniProSC, I just need to do more testing on passes.
Enabling the color waterfall also will help with visually picking out the packet signal on the waterfall. You will need to enable the KISS server setting and pick a random high port, which the Greencube software will connect to.
If you are using only audio cables, you will need to set the PTT port to NONE and use one of these to manually trigger transmission:
- the rear PTT jack
- the PTT jack on the AD-Y-1
- MOX
Otherwise, if you are using a sound card that interfaces with the PKT port set the PTT COM port in Soundmodem to the same port that PstRotator is using for CAT control to auto trigger PTT.
If everything is set up correctly you should now see audio scrolling down the waterfall in Soundmodem. You will now want to move the white bar in the waterfall in the bottom of Soundmodem to span roughly 800kHz to 1800 kHz, around the center of the 3kHz USB passband.
Now you will need to get on a satellite pass and adjust PstRotator’s frequency offset to put the packet signals from the satellite directly over the white bar above. The signal width of the packet transmissions is slightly wider than the 1kHz bar, so you should be able to center the transmissions so the white bar is directly in the middle. PstRotator will revert your changes if you try to move the dial (at least with standard settings), so once the software is tracking Greencube overhead with UP + DN enabled, use the << and >> (for larger adjustments) and </> (for fine adjustments) until you see Soundmodem start to decode signals. Like all satellites, you should make sure you can clearly hear the downlink before trying to transmit.
Polarization is important, but directionality seems less so with Greencube. If you are using your antenna handheld like I do, adjust polarization when you’re hearing signals until you get the loudest signal and if you hear it loudly enough Soundmodem should start being able to decode messages. If needed because you’re in a high noise area, you can use RF gain to help decode messages, but in general you want as little processing of the signal (RF AMP on, no AGC, no noise blanker or noise reduction, etc). Short bursts are usually other radio operators, longer bursts are usually telemetry from the satellite that does not decode in the Greencube software. Once I have the satellite dialed in with the frequency adjustment buttons in PstRotator, I do not have to touch downlink frequency again through the entire pass.
Configuring GreenCube Digipeater
You need to configure the same port in KISS TNC Setup that you set up in Soundmodem. That should enable communication between the two applications.
Fill in your callsign into MyCall and leave ToCall as ALL if you want to call CQ. You can and should set up some macros in the buttons along the top row by right clicking them. You will want your messages to be as concise and repeatable as possible to avoid spend typing during the pass and cutting down on transmission time. Mine are configured as follows:
| Label | MSG | ToCall | Re-TX Delay |
|---|---|---|---|
| CQ | CQ DM33xj Arizona | ALL | 0 |
| QSL | UR 599 DM33 | ||
| 73 | RRR 73 TNX QSO! |
If you send a custom message or click one of these macro buttons you should see a message attempt to transmit via Soundmodem.
QSO process
Making a QSO with the FT-847 with this setup is more manual than with an IC-9700 but very doable, particularly if you have a sound card leveraging the PKT port that can trigger PTT automatically.
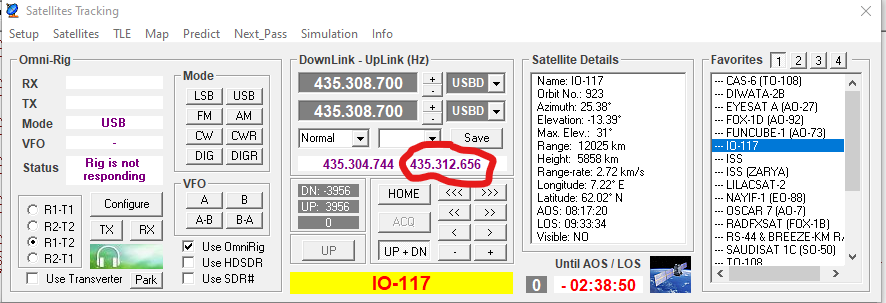
The hardest part of making a QSO will be the manual frequency adjustment on the uplink. As the pass continues, you will need to use the sub-tune VFO knob and manually synchronize it to the uplink frequency displayed in PstRotator:

As expected, that frequency will move faster when the satellite is moving overhead but move more slowly when the satellite is lower or nearer the horizon. Your uplink frequency will need to be very close to the displayed frequency in PstRotator or Greencube will not digipeat your signal, so making sure the frequency is correct is critical. Depending on how quickly the frequency is shifting, it may make sense to adjust the frequency slightly above the current frequency so the frequency is correct by the time you actually send your message.
Because the 847 does not have a VOX circuit, you will have to manually PTT just before you transmit, using a PTT switch, or toggling on/off MOX just before and after your packet transmission is complete. Because you are transmitting on SSB, you can watch the power output meter on the FT-847 and once the output power drops back to 0, release PTT or toggle off MOX. I have had a lot of success with 10W power output on 70cm. If you stay transmitting too long by accident, you won’t be able to monitor for the digipeated message coming back from the satellite (seeing your own message). I try to transmit a message until I see it is digipeated, as a guarantee that others are actually receiving my packets. You can see an example here with two messages transmitted, and only after the second transmit was my message digipeated as indicated with an RX.

Be sure to monitor the RX delay in the right column, several operators are using the store and forward functionality of the satellite to contact other users outside the satellite’s footprint and those would not count as valid QSOs for many purposes.
If you double click on a callsign in the Greencube software, their call will be populated into the ToCall field and from there you can respond to others by just clicking the second and third buttons in sequence to complete the QSO. The preset buttons on the top of the Greencube software allow for fast QSOs, similar to FT8, but you can also send a custom message if you want (I don’t because my hands are already full). I don’t log a valid QSO until I see that my final “73” message is digipeated through the satellite.
This method takes quite a bit of coordination, particularly if you are hand-holding your antenna, but it is doable with the FT-847 and minimal other equipment.
If you have any suggestions or have worked IO-117 with an FT-847 with less to juggle, please let me know!